Upload a file on SFTP server using SSH key or Username/Password in D365 using x++ (Part 1)
Understanding SFTP Server Connectivity: A Simple Guide
Today, we are going to dive into SFTP server connectivity. I’m assuming you already have some basic knowledge of SFTP, but if not, don’t worry, feel free to Google and explore other blogs to enhance your understanding.
There are two primary ways to connect to an SFTP server:
Using Username and password
Using Username and SSH key
1. Username and Password Authentication
Username: Your SFTP username.
Password: The password associated with your SFTP username.
Hostname: This could either be the IP address or domain name of the SFTP server.
Port Number: By default, SFTP uses port 22.
Destination Folder: Typically, the default destination folder is /upload when an SFTP server is created.
2. Username with SSH Key Authentication
For enhanced security, you can connect using an SSH key instead of a password. Here’s what you’ll need:
Username: Your SFTP username.
SSH Key: The private key file associated with your SFTP account.
SSH Key Passphrase: The password used to encrypt your SSH key file (if one was set).
Port Number: By default, this remains port 22 for SFTP.
Destination Folder: As with the password method, the default folder is usually /upload.
Checking Your Connection with FileZilla
To verify that your connection to the server is successful, you can use FileZilla. This free and open-source software allows you to transfer files over FTP, SFTP, and FTPS protocols, making it ideal for managing files on remote servers such as web hosting services.
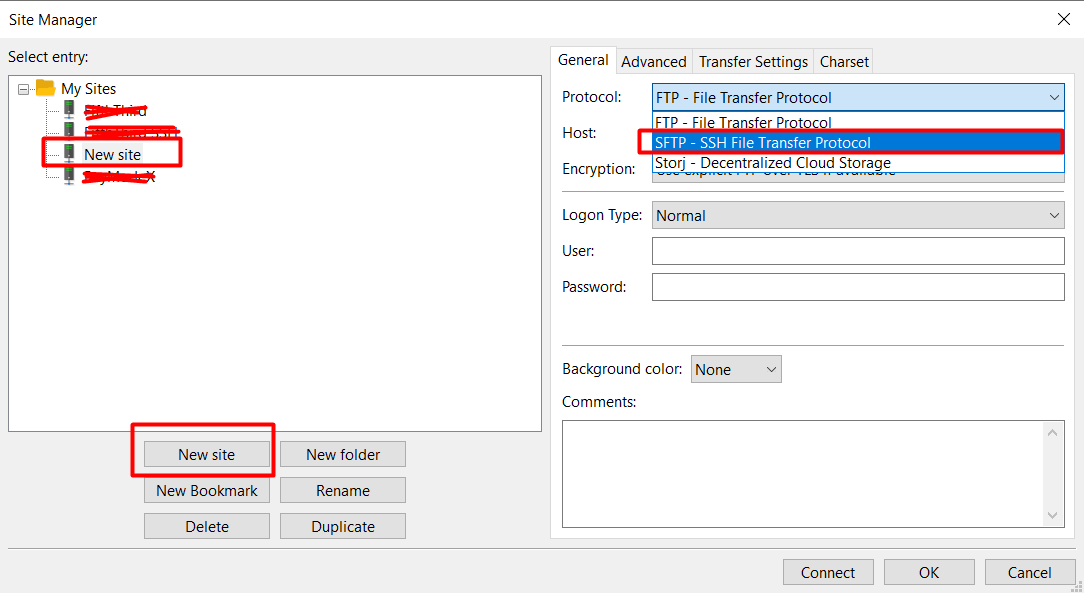
Here’s how you can connect with FileZilla:
1) Using Username and Password
Open FileZilla and do the following:


Now fill in the following details:
Hostname: Enter the server IP address or domain name.
Username: Enter the SFTP username.
Password: Provide the SFTP password.
Port: Ensure port 22 is selected.

Click Connect to initiate the connection.

2) Using Username and SSH Key

In FileZilla, enter your SFTP username.
Select the path for the SSH private key file.

Enter the SSH key passphrase (if required).

Click Connect, and in just a few seconds boom! You’ll be connected.

Now you’re all set to start transferring your files securely to and from the SFTP server!
Let’s move to the code part now.
In Dynamics 365 (D365), we use the Renci.SshNet library for establishing SFTP connections.
Now we will walk through installing the Renci.SshNet library in Visual Studio, and how to upload files to an SFTP server using the Renci.SshNet.Async DLL.
Step 1: Install the Renci.SshNet Library in Visual Studio
If you don't already have the necessary NuGet packages, you can download the Renci.SshNet.Async package using the following link:

To install the package:
Open your Visual Studio solution and right-click on the solution in the Solution Explorer.
Select Manage NuGet Packages for Solution.
In the NuGet Manager, go to the Settings (gear icon).
Add a new folder that contains the downloaded Renci.SshNet.Async package.
Select the folder where you saved the DLL file, click OK, and then install the package in your Visual Studio project.


Step 2: Add the Reference to Your Project in AOT
- Once the package is installed, you need to add a reference to the Renci.SshNet library in your project from the Application Object Tree (AOT).

Step 3: Code Implementation for Uploading Files to SFTP
Now, we will create a method to upload files to an SFTP server. We'll use a table called SFTPCredentials to store connection details like the server host, username, password, port, and file path.
Here is the X++ code to implement the SFTP file upload:
internal final class UploadFileToSFTP
{
    public static void uploadFile(StreamIo file, Filename filename, SFTPCredentials SFTPCredentials)
    {
        System.IO.Stream input =  file.getStream();

        try
        {
            input.Position = 0;

            Renci.SshNet.SftpClient sftp = new Renci.SshNet.SftpClient(SFTPCredentials.ServerHost, SFTPCredentials.UserId, SFTPCredentials.Password);

            sftp.Connect();

            if(sftp.IsConnected)
            {
                sftp.ChangeDirectory(@"/" + SFTPCredentials.FilePath);
                sftp.BufferSize = 8 * 1024;
                sftp.UploadFile(input, filename,true,null);
            }
            else
            {
                Error('SFTP server connection failed.');
            }
        }
        catch(Exception::CLRError)
        {
            System.Exception ex = CLRInterop::getLastException();
            Error(ex.InnerException.Message);
        }
    }
}
Explanation:
The method
uploadFileaccepts the file, filename, and SFTP credentials as parameters.It attempts to establish an SFTP connection using the credentials stored in the
SFTPCredentialstable.If the connection is successful, it changes the directory on the SFTP server and uploads the file using the provided file stream.
Troubleshooting:
If you run into any issues or need assistance with the implementation, feel free to reach out. I'll be happy to help.
In the next post, I will cover how to implement Username and SSH Key authentication for the SFTP connection. Stay tuned!
